Entradas

Mostrando entradas de febrero, 2022

07 Vaadin Screens

Imagen

06. Using ajax (jQuery) to change text in jsp. Language selector. Change event

Imagen
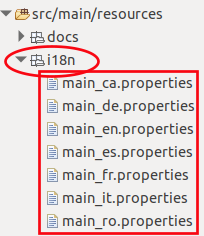
0. Introduction In this blog, it will be seen: 1. Create a "select" for selecting the language 2. Use an icon with the flag of the language 3. Use the change event to trigger a jQuery ajax call to the server 4. Create a js module to store javascript utilities The structure of the project is: The result is: 1. Create a "select" for selecting the language Here is the code (to be inserted in the index.jsp) <select id= " myLanguage " onchange= "changeLanguage()" > <option value= "es" > Español> </option> <option value= "ca" > Valencià </option> <option value= "en" > English </option> <option value= "fr" > Francaise </option> <option value= "de" > Deustch </option> <option value= "it" > Italiano </option> <option value= "ro" > Românesc </option> </select>

05. Resource bundles (i18n)

Imagen
 1. Introduction There are several ways to use resource bundles. By now, let's use  java  instead of xml ( <%@ taglib prefix="fmt" uri="http://java.sun.com/jsp/jstl/fmt" % > ) 1. First lay the resource files ( main _ language .properties ) in the folder  src/main/resources/i18n 2. Create a jsp file 3. Add a new page directive with the includes ( Locale y ResourceBundle ) 4. Get the locale from the request and the resource bundle from the relative path " i18n/main " 5. Assign the localized value using   <%=bundle.getString("key") %> The source code is <%@ page language = "java" contentType = "text/html; charset=UTF-8" pageEncoding = "UTF-8" %> <%@ page import = " java.io.* , java . util . Locale , java . util . ResourceBundle " %> <!DOCTYPE html> <html> <head> <meta http-equiv= "Content-Type" content= "text/html;

04. Download (Files, Streams...). Show PDFs. Anchor problem, Iframes

1. Introduction It is important to download resources from the web (PDFs, CSVs, images..) Let's follow these steps: 2. Prerequisites: Add dependencies 1. Add the reference to Apache commons-io in the build.gradle file /* * This file was generated by the Gradle 'init' task. * * This generated file contains a sample Java library project to get you started. * For more details take a look at the 'Building Java & JVM projects' chapter in the Gradle * User Manual available at https://docs.gradle.org/6.8/userguide/building_java_projects.html */ plugins { // Apply the java-library plugin for API and implementation separation. id 'java-library' id 'war' } repositories { // Use JCenter for resolving dependencies. jcenter() } dependencies { // Use JUnit test framework. testImplementation 'junit:junit:4.13' // JSP & SERVLETS compileOnly 'jakarta.servlet:jakarta.servlet-api:5.0

03. Servlets, Filters and Listeners

 1. Introduction This page is based on Baeldung Since java servlet 3.0, no "web.xml" file is needed. this file has been replaced by annotations 2. Servlets The @ WebServlet annotation is used: @WebServlet ( urlPatterns = "/trim" , name = "trimServlet" ) public class TrimServlet extends HttpServlet { public void doGet ( HttpServletRequest request , HttpServletResponse response ) throws IOException { String inputString = request . getParameter ( "input" ). trim (); PrintWriter out = response . getWriter (); out . println ( inputString ); } } 3. Filters Whose mission is to intercept requests or responses. In this case, intercepts the call to the previous servlet and check if the parameter "input" is correct. The @ WebFilter annotation is used @WebFilter ( urlPatterns = "/trim" ) public class EmptyParamFilter implements Filter { @Override public vo
02. Scripting elements

1. Scripting elements These are the 5 scripting elements  Comment <%-- Set of comment statements --%> Directive <%@ directive %> Declaration <%! declarations %> Scriptlet <% scriplets %> Expression <%= expression %>  2. Directives There are 3 directives : Page: <%@ page attribute = "attribute_value %>  Include: <%@ include ... %> Taglib: <%@ taglib ... %> * For the page directive , that has this equivalent in XML:  <jsp:directive.page attribute = "attribute_value" />   these attributes are used: 1. buffer (size) 2. contenType (document's MIME in the HTTP response header) 3. autoflush (decides if the buffer output should be flushed automatically) 4. errorPage (to handle JSP errors) 5. import (list of classes and packages used) 6. isErrorPage (if this is an error page) 7. info (information that can be obtained using getServletInfo() from the servlet) 8. isThreadSafe (for defining the thread model) 9. Langu

01. First Project (Eclipse + Tomcat 10 + Java 17)

Imagen
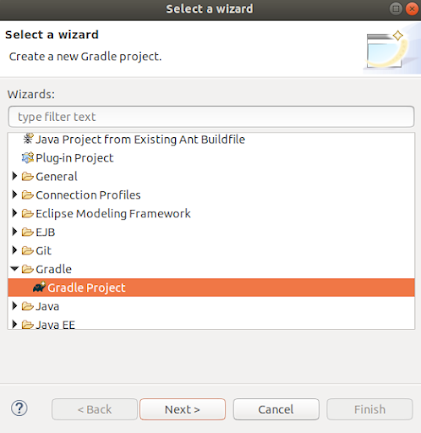
This post has been inspired by  Nam Ha Minh . 1. Create a Gradle project   From the top left menu select:  File - New -Other -Gradle -Gradle Project Give a project name (JSP-02 for instance)  Click on "Configure Workspace Settings" Verify versions of Java ( 17 ) and gradle ( 7.4 )  are selected Click finish. Right-click on the created project and select Delete but DO NOT CHECK to delete project contents Now go to the project folder and delete all the files except the folder "lib" Move the content of the lib folder to the project folder and delete the "lib" folder Import the gradle project again to eclipse File - Import -Gradle -Existing Gradle Project Select the project to import ( JSP-02 ) Accept all the default options and click Finish The project has been imported Now you should verify that the java 17 is being used . So right-click on the project and select Build Path - Configure build Path and verify java version 2. Configure the file build.gradle Th