01. First Project (Eclipse + Tomcat 10 + Java 17)
1. Create a Gradle project
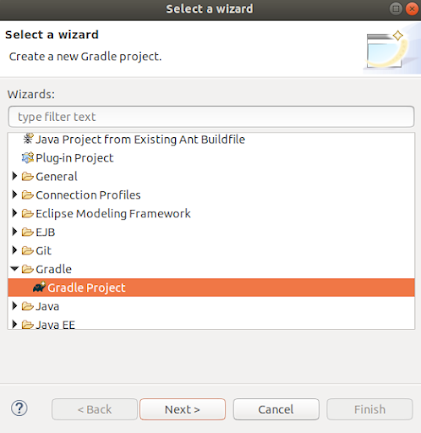
From the top left menu select: File - New -Other -Gradle -Gradle Project
Give a project name (JSP-02 for instance)
Click on "Configure Workspace Settings"
Verify versions of Java (17) and gradle (7.4) are selected
Click finish.
Right-click on the created project and select Delete but DO NOT CHECK to delete project contents
Now go to the project folder and delete all the files except the folder "lib"
Move the content of the lib folder to the project folder and delete the "lib" folder
Import the gradle project again to eclipse
File - Import -Gradle -Existing Gradle Project
Select the project to import (JSP-02)
Accept all the default options and click Finish
The project has been imported
Now you should verify that the java 17 is being used . So right-click on the project and select Build Path - Configure build Path and verify java version
2. Configure the file build.gradle
This is the build.gradle file
1 2 3 4 5 6 7 8 9 10 11 12 13 14 15 16 17 18 19 20 21 22 23 24 25 26 27 28 | /* * This file was generated by the Gradle 'init' task. * * This generated file contains a sample Java library project to get you started. * For more details take a look at the 'Building Java & JVM projects' chapter in the Gradle * User Manual available at https://docs.gradle.org/6.8/userguide/building_java_projects.html */ plugins { // Apply the java-library plugin for API and implementation separation. id 'java-library' id 'war' } repositories { // Use JCenter for resolving dependencies. jcenter() } dependencies { // Use JUnit test framework. testImplementation 'junit:junit:4.13' compileOnly 'jakarta.servlet:jakarta.servlet-api:5.0.0' compileOnly 'jakarta.servlet.jsp:jakarta.servlet.jsp-api:3.0.0' implementation 'org.glassfish.web:jakarta.servlet.jsp.jstl:2.0.0' |
The old "javax.*" packages have been replaced by the new "jakarta.*"
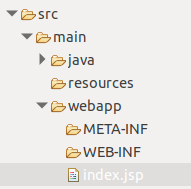
Add a new folder named "webapp" in the src/main folder
3. Creating other folders
In the webapp folder create 1 folder:
- META-INF
WEB-INF(NO)
4. The first jsp file
1 2 3 4 5 6 7 8 9 10 11 12 13 14 15 16 | <%@ page language="java" contentType="text/html; charset=UTF-8" pageEncoding="UTF-8"%> <!DOCTYPE html> <html> <head> <meta http-equiv="Content-Type" content="text/html; charset=ISO-8859-1"> <title>JSP-02</title> </head> <body> <h1>Hello JSP and Servlet!</h1> <form action="helloServlet" method="post"> Enter your name: <input type="text" name="yourName" size="20"> <input type="submit" value="Call Servlet" /> </form> </body> </html> |
5. The first servlet
1 2 3 4 5 6 7 8 9 10 11 12 13 14 15 16 17 18 19 20 21 22 23 24 25 26 27 28 29 30 31 32 33 34 35 36 37 38 39 40 41 42 43 44 45 46 47 48 | package ximojsp; import jakarta.servlet.http.HttpServlet; import java.io.IOException; import java.io.PrintWriter; import jakarta.servlet.ServletException; import jakarta.servlet.annotation.WebServlet; import jakarta.servlet.http.HttpServletRequest; import jakarta.servlet.http.HttpServletResponse; /** * Servlet implementation class HelloServlet */ @WebServlet(urlPatterns="/helloServlet", name="helloServlet") public class HelloServlet extends HttpServlet { private static final long serialVersionUID = 1L; /** * @see HttpServlet#HttpServlet() */ public HelloServlet() { super(); System.out.println("Creationg Servlet"); // TODO Auto-generated constructor stub } /** * @see HttpServlet#doPost(HttpServletRequest request, HttpServletResponse response) */ protected void doPost(HttpServletRequest request, HttpServletResponse response) throws ServletException, IOException { String yourName = request.getParameter("yourName"); System.out.println("yourName="+yourName); PrintWriter writer = response.getWriter(); writer.println("<h1>Hello " + yourName + "</h1>"); writer.close(); } } System.out.println("Creationg Servlet"); // TODO Auto-generated constructor stub } } |
6. If there are compile errors:
- Verify that the WEB-INF folder is empty. Delete all the files (in my case web.xml)
- If the error is in the build.gradle verify that all the claudators and parenthesis are closed.


Comentarios
Publicar un comentario